
My first Victory pattern is complete, and I love the result. Victory is a company from Canada that makes women's patterns. I chose this pattern because it was labeled intermediate, and I wanted to be able to tell customers and students what "intermediate" means to Victory. I would say this pattern is more advanced not because of the fit or the technique but because of all of the stitching in the ditch that must be done. I barely had to serge because there were so many seams covered by a lining. If I was not good at stitching in the ditch before, I am now!
You do it on the front placket then again when attaching the yoke and on each sleeve cuff. I love how it turned out, but I would say that is an advanced skill if you want it to look good or you just have to sew very, very slowly. The pattern says you can hand sew instead of stitching in the ditch but you should know by now I do not hand sew unless I have to. Stitching in the ditch was a good compromise for me.

I do love how Victory prints their patterns with the symbol ledged and size ledged on the tissue paper. I also liked the beginning instructions. I love a well written glossary. If you are not familiar with the stitch in the ditch technique, this is what their glossary has to say: "Sewing onto the right side of the garment, the stitch is sewn along the crack of an existing seam. This is intended to secure fabric on the underside of the garment in place, such as the underside of a waistband. Hand stitching can be done in place of stitch in the ditch.”
The instructions also tell you to zig-zag or serge everything first because I read all of the directions first I realized this would NOT be a good idea since there are so many covered seams. Knowing this I had to make sure I finished all of my seams there were not covered as it was not written in the step by step instructions.

Fabric Selection: The pattern suggests for the shell, a light to medium weight fabric with a soft, flowing drape, such as silk, light cotton, rayon, crepe, voile or linen, and for the yoke a medium weight fabric.
I decided to use an Art Gallery mid-weight quilting cotton for all of it. If I were to make it again, I might try a voile or rayon. I do not think any mid-weight cotton would work for the shell; only Art Gallery is light enough to work. In Charleston, everyone wears cottons and rayons. I think a voile, rayon, seersucker, or Art Gallery cotton would work for the shell, and any quilt weight cotton or even a lightweight corduroy would work for the yoke. I love Leah Duncan's Tule collection, I have already used it in the Easy Pleazy Pleats dress but wanted more!
Sizing: I decided to make a size 2 because my bust measurement is a 33. My waist is size 8 and my hips are a size 4; I’m pretty much a log...no hourglass here! I decided on the 2 because the pattern was conveniently marked at the waist and hip with an asterisk meaning the garment is free at the hip and waist. I have a small bust for my frame, so I think my shoulders and arms would have been happier in a 4, so I just changed the seam allowance in the sleeve attachment.
Pintucks: The pintucks were easy and look great. My only complaint is that they are marked on the pattern using the sewing line. I would rather have the fold line marked and then I sew 1/8" away from the fold.

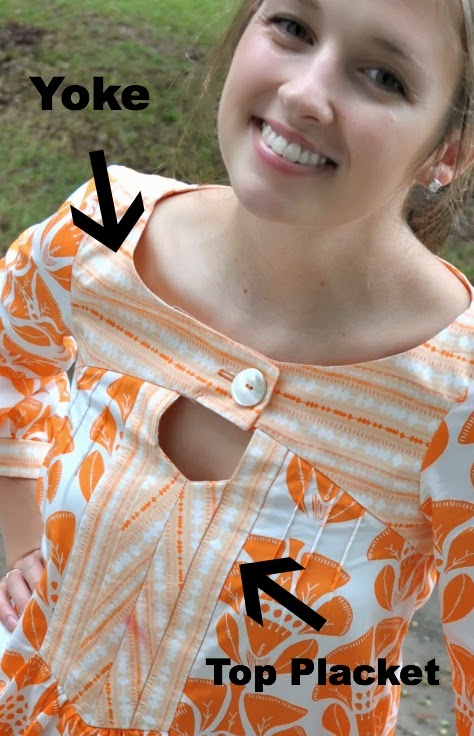
Top Placket: This was actually very easy. The pattern looks like this step would be the hardest part, but it is just an illusion. They suggest you use stripes for this part to create that detailed effect. I did choose a striped pattern, but my stripes are not straight. I tried and tried to line them up to get a chevron effect and failed. The lines are just not straight, and it was not worth buying an extra half yard of fabric to line them up. I actually like the look. I also cut this piece upside downs, so my chevron is pointing up not down. This was an accident but I still like it. The pattern piece is clearly labeled—I just missed it. I did version B, so I was able to skip some of the steps. Somehow, I missed the gathering step and had to go back and create gathers after my placket was halfway on. The gathering step is in the version 1 “attach the straps” section. Honestly, it is common sense to gather first; I just always like to follow the directions exactly the first time I make something.


Cuffs and Sleeve: The cuffs were very easy to make and look great. The only issue was that the pattern piece had the button hole placed outside the pattern piece. I just waited until it was made and marked a buttonhole that worked for me. The sleeve was a little tight, so I changed the seam allowance to 3/8" instead of 5/8" This was a better fit for me.


There were a few places in the directions I had to reread or had to baste, rip, and sew just to figure out the correct way. Overall, I am very happy with how it turned out. If you want to challenge yourself with stitching in the ditch, then this is a great project. That is one technique I have never mastered because I do not do it often enough, and if you look at my garment, you can see I got better and better until the last cuff. I thought I might go back and add the straps to version 2 even though it’s just the tunic and has sleeves, but after putting it on I like it loose.
The instructions also tell you to zig-zag or serge everything first because I read all of the directions first I realized this would NOT be a good idea since there are so many covered seams. Knowing this I had to make sure I finished all of my seams there were not covered as it was not written in the step by step instructions.

Fabric Selection: The pattern suggests for the shell, a light to medium weight fabric with a soft, flowing drape, such as silk, light cotton, rayon, crepe, voile or linen, and for the yoke a medium weight fabric.
I decided to use an Art Gallery mid-weight quilting cotton for all of it. If I were to make it again, I might try a voile or rayon. I do not think any mid-weight cotton would work for the shell; only Art Gallery is light enough to work. In Charleston, everyone wears cottons and rayons. I think a voile, rayon, seersucker, or Art Gallery cotton would work for the shell, and any quilt weight cotton or even a lightweight corduroy would work for the yoke. I love Leah Duncan's Tule collection, I have already used it in the Easy Pleazy Pleats dress but wanted more!
Sizing: I decided to make a size 2 because my bust measurement is a 33. My waist is size 8 and my hips are a size 4; I’m pretty much a log...no hourglass here! I decided on the 2 because the pattern was conveniently marked at the waist and hip with an asterisk meaning the garment is free at the hip and waist. I have a small bust for my frame, so I think my shoulders and arms would have been happier in a 4, so I just changed the seam allowance in the sleeve attachment.
Pintucks: The pintucks were easy and look great. My only complaint is that they are marked on the pattern using the sewing line. I would rather have the fold line marked and then I sew 1/8" away from the fold.

Pintucks in the back
Top Placket: This was actually very easy. The pattern looks like this step would be the hardest part, but it is just an illusion. They suggest you use stripes for this part to create that detailed effect. I did choose a striped pattern, but my stripes are not straight. I tried and tried to line them up to get a chevron effect and failed. The lines are just not straight, and it was not worth buying an extra half yard of fabric to line them up. I actually like the look. I also cut this piece upside downs, so my chevron is pointing up not down. This was an accident but I still like it. The pattern piece is clearly labeled—I just missed it. I did version B, so I was able to skip some of the steps. Somehow, I missed the gathering step and had to go back and create gathers after my placket was halfway on. The gathering step is in the version 1 “attach the straps” section. Honestly, it is common sense to gather first; I just always like to follow the directions exactly the first time I make something.

Yoke: The yoke was very easy to make and attach. I decided not to use interfacing, but now I wish I had used a very, very light interfacing.
Cuffs and Sleeve: The cuffs were very easy to make and look great. The only issue was that the pattern piece had the button hole placed outside the pattern piece. I just waited until it was made and marked a buttonhole that worked for me. The sleeve was a little tight, so I changed the seam allowance to 3/8" instead of 5/8" This was a better fit for me.


There were a few places in the directions I had to reread or had to baste, rip, and sew just to figure out the correct way. Overall, I am very happy with how it turned out. If you want to challenge yourself with stitching in the ditch, then this is a great project. That is one technique I have never mastered because I do not do it often enough, and if you look at my garment, you can see I got better and better until the last cuff. I thought I might go back and add the straps to version 2 even though it’s just the tunic and has sleeves, but after putting it on I like it loose.
I hope you enjoy your finished product as much as I did!


No comments:
Post a Comment